
Fixing a Leak in the Wall: Detection & Repair Guide
Identifying and Repairing Wall Leaks Effectively
A leak behind a wall can stay hidden long enough to damage drywall, framing, insulation, flooring, and nearby fixtures. The key is to recognize early warning signs, use careful leak detection methods, stop the source, and repair both the plumbing and the affected wall materials. When the problem is more than a simple visible drip, a licensed plumbing professional can help prevent repeated damage and unnecessary demolition.
What are the first signs of a leak in the wall?
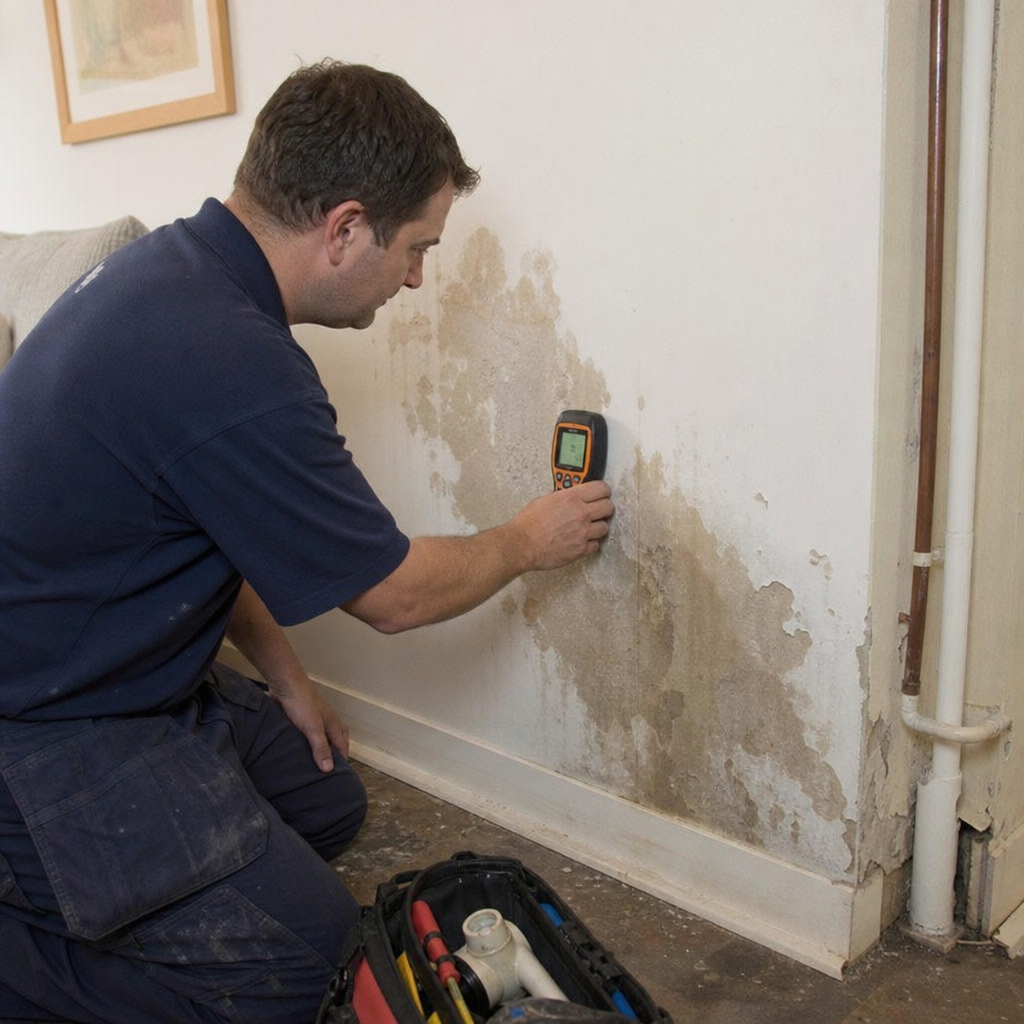
The first signs of a leak in the wall are usually changes in the surface, smell, sound, or temperature of the area. You may notice stains, bubbling paint, soft drywall, a musty odor, unexplained dampness, or the sound of water running when fixtures are off. These symptoms should be treated seriously because a small hidden leak can become a larger water damage wall problem if it continues unchecked.
A wall leak is not always dramatic. Sometimes it starts as a faint discoloration near a baseboard, a slightly warped section of trim, or a patch of paint that looks shinier than the surrounding surface. In bathrooms, kitchens, laundry rooms, and utility areas, these changes may appear near supply lines, drain pipes, valves, or fixtures.
Other clues are less visible. If your water bill rises without a clear reason, water pressure changes suddenly, or one room feels unusually humid, there may be moisture trapped where you cannot see it. The sooner you investigate, the better your chances of limiting structural damage, mold growth, and costly repairs.
Why wall leaks need quick attention
Water moves through wall cavities in unpredictable ways. A leak may begin at a pipe joint upstairs but show up as a stain on a lower wall or ceiling. Because drywall, insulation, and wood can absorb moisture, the visible mark is often only part of the problem.
Quick action matters for three practical reasons. First, wet materials break down over time, making walls soft, cracked, or unstable. Second, trapped moisture can create conditions where mold and mildew are more likely to spread. Third, ongoing leaks waste water and may keep damaging the same area even after cosmetic repairs are made.
Painting over a stain or replacing a small drywall patch without addressing the plumbing source is only a temporary fix. If the leak is still active, the new materials can become damaged again. Effective repair starts with finding the source, not hiding the symptom.
Common causes of hidden wall leaks
A wall leak can come from several plumbing and building-related issues. Understanding the likely causes helps you describe the problem clearly when calling for service and helps prevent repeat damage after the repair.
Common causes include:
Aging or corroded pipes: Older supply lines can weaken, especially at joints, elbows, and connection points.
Loose fittings or failed seals: Small gaps around valves, fixture connections, or pipe fittings can release water slowly.
Drain line leaks: Wastewater pipes behind sinks, tubs, showers, or laundry areas may leak only when the fixture is in use.
Shower or tub surround failures: Cracked grout, failed caulk, or gaps around fixtures can let water enter the wall.
Appliance connections: Washing machines, refrigerators, dishwashers, and water heaters can leak near supply or drain lines.
High water pressure: Excessive pressure can strain pipes and fittings, increasing the chance of leaks over time.
Exterior water intrusion: Not every wet wall is caused by plumbing. Roof, window, siding, or foundation issues may also create moisture inside walls.
Because several problems can look similar, professional leak detection is often the safest path when the source is not obvious.
How does leak detection work without tearing open the wall?
Modern leak detection often uses non-invasive or minimally invasive methods to narrow down the problem before opening a wall. A plumber may inspect fixture connections, test water pressure, listen for movement in pipes, use moisture meters, or check temperature differences with specialized tools. The goal is to confirm the leak’s location as accurately as possible so repairs can be targeted rather than destructive.
The process usually starts with observation. A plumber will look at the pattern of staining, the rooms above or around the wall, nearby fixtures, and whether the dampness appears constantly or only after water is used. This helps separate supply line leaks, drain leaks, and fixture-seal problems.
From there, testing can help confirm the source. For example, if moisture increases only after running a shower, the issue may be connected to the shower valve, drain, grout, or caulking. If moisture remains steady even when fixtures are not in use, a pressurized supply line may be involved. Careful testing reduces guesswork and helps protect your home from unnecessary wall removal.
Repairing the plumbing source first
Effective wall leak repair begins with the plumbing issue. Depending on the cause, that may mean tightening or replacing a fitting, repairing a cracked pipe, replacing a damaged valve, resealing a fixture, or correcting a faulty drain connection. In some cases, replacement work is the more reliable option, especially when pipe sections, shutoff valves, or fixture components are worn or repeatedly failing.
A quality repair should address the immediate leak and the conditions that caused it. For example, if high water pressure contributed to the failure, repairing one joint may not be enough. If a pipe section is deteriorated, patching a single pinhole may leave nearby weak spots ready to leak later.
This is where professional judgment matters. A plumber can explain whether a repair is likely to last or whether replacement is the better long-term choice. The right decision depends on the material, age, accessibility, severity of damage, and whether other plumbing components show signs of wear.
Preventing future wall leaks
Not every leak can be prevented, but routine awareness can reduce risk. Pay attention to small changes around plumbing fixtures, especially in rooms with heavy water use. A small stain, loose valve, dripping supply line, or cracked caulk line is easier to correct before it becomes a hidden wall leak.
Helpful prevention habits include:
Check under sinks and around appliance hoses regularly.
Replace brittle, cracked, or bulging supply lines.
Keep shower caulk and grout in good condition.
Know where your main water shutoff valve is located.
Avoid ignoring sudden changes in water pressure.
Schedule plumbing service when leaks repeat in the same area.
These simple habits help you catch problems earlier and respond faster when something changes.
The takeaway
A hidden wall leak is more than an inconvenience; it is a problem that can affect plumbing, drywall, insulation, flooring, and indoor air quality. The best approach is to identify the warning signs, use careful leak detection, repair the source first, and restore damaged materials only after the area is dry.
If you suspect a leak in the wall, do not wait for the stain to grow. Contact Umbrella Plumbing for professional leak repair, clear guidance, and any necessary replacement work to protect your home from further damage.
